Last Update: 15/02/24
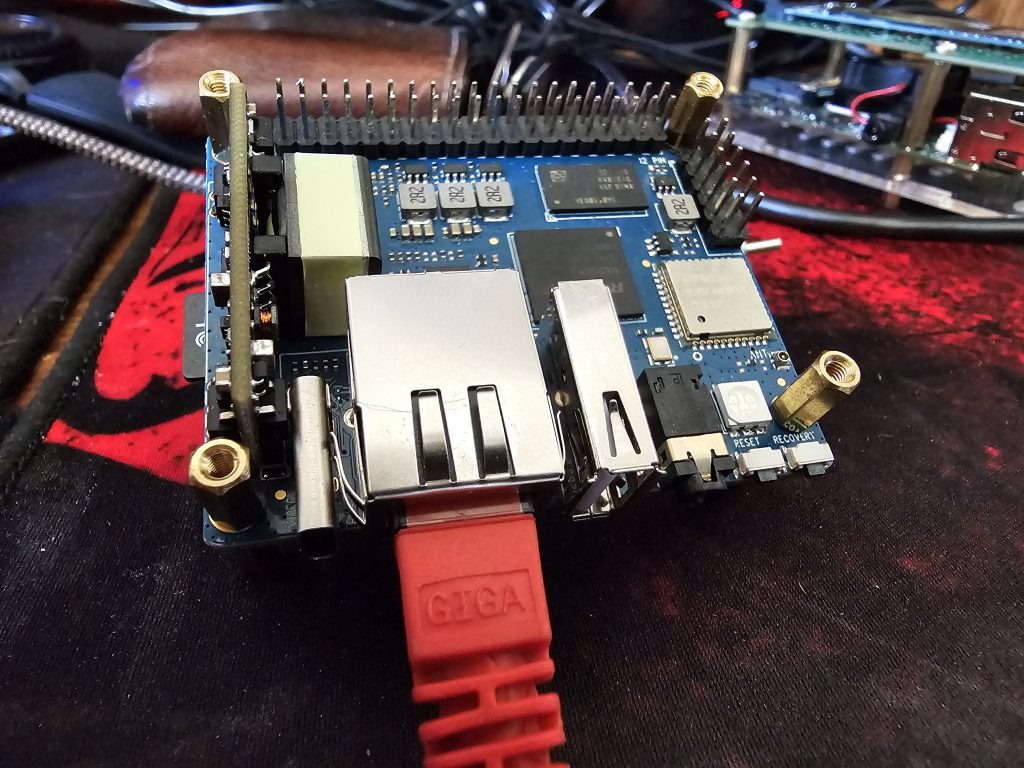
The Banana-Pi BPi-P2 Pro is a new development board that uses a RockChip Arm Processor.
- 64 Bit Quad-Core Arm Cotrex-A35, using the RockChip RK3308
- 512 GB DDR3 ( In this blog post, my unit only has 256GB )
- 8 Gig of on board eMMC Storage
- 40 PIN GPI, and 12 PIN side ( includes UART, SPI, I2C, IO, and more )
- 100 M LAN, that supports Power of Ethernet
- 1 USB 2.0 Port.
These are designed to be IoT device, Intelligent Speech Recognition device (there is a microphone on the board), Robot Control or more. It is a development board unlimited possible.
Part 1 – Setup SD Card
The first thing you need to do it download the RockChip SDDiskTool (NOTE: don’t use Etcher to make the SD card, it will report that’s there “It looks like this is not a bootable image”) The SDDisktool will create the SD Card the correct way.
Unzip the tool onto the PC. Before using the SDDiskTool, we need to change the configuration file in order to run it in English. Under the folder, locate the config file and open with NotePad.
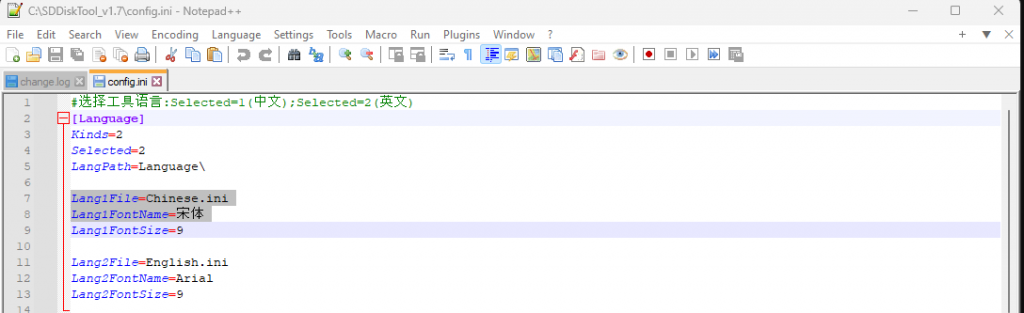
Under [Language], change the “Selected” from 1 to a 2. Then save the file.
- 1 = Chinese
- 2 = English
Try open the program to make sure that it’s in English.
Once the SDDiskTool has been setup, an image needs to be downloaded. Use the following link to download an image.
( NOTE: If you are in the US, use the Google Drive Link, Baidu is the Chinese Google, you will need to download an app, that is only in Chinese. )
In SDDiskTool, make sure the tool is setup as follows.
- First Choose: The SD Drive that the image will be written too. ( At this time, recommend to use a 8 or 16GB SD Card, due the file system being setup like an Android File System. Anything better will be a watch of disk space. )
- Second Choose: Select “SD Boot“
- Third Choose: The Image that will wrote to the SD call.
- Forth Choose: Leave Blank
This image is example:
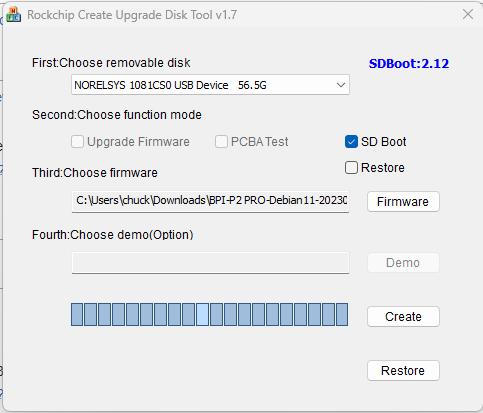
When everything is setup, click on “Create” button. (This could take a few minutes to finish). Once done, remove the SD Card place into SD slot of the BPi-P2 Pro. If you have an UART Cable, start with Part 4.
Part 2 – Powering up without UART Cable with a Router with a Gui.
The Banana-Pi BPi-P2 Pro does not come with an HDMI Port. Most People will connect the device with an UART cable to the device to see boot up.
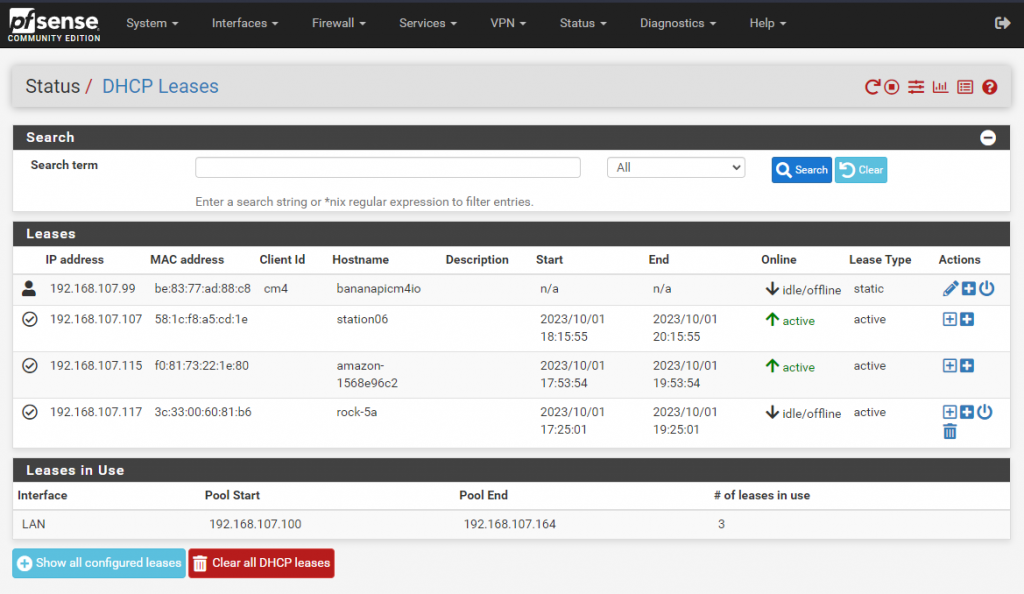
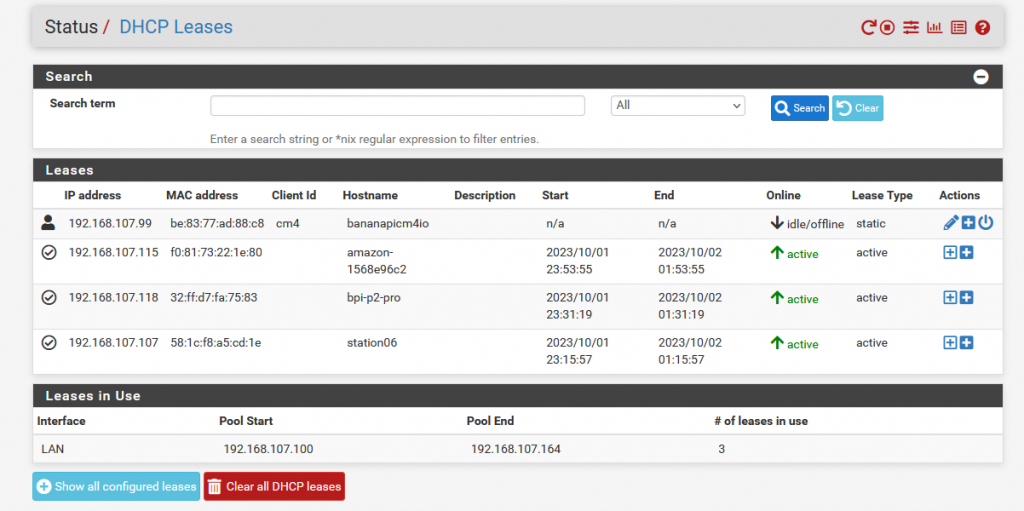
Here how to use a route to find the device. In this example, pfSense will be used. Login to the router go
Status –> DHCP Leases
- Plug an ethernet cable in the back of the router or a switch that the switch is plugged into.
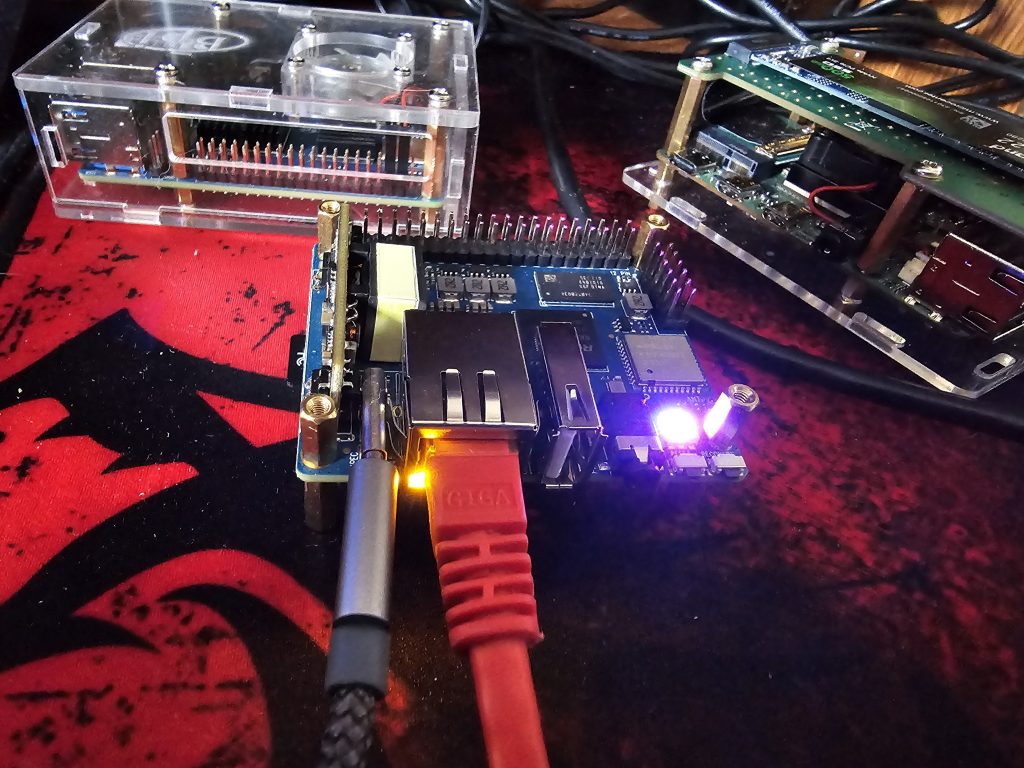
2. Plug the other end of the ethernet cable into the Banana-Pi. If the switch is Power Over Ethernet, the Banana-Pi BPi-P2 Pro will come on.
3. Plug in a power supply. A Raspberry Pi 4 USB-C or a USB-C Power that has 5V/4A. If the SD Card was created correctly, the LED light will turn pink and will flash a green light. Also, the ethernet port will turn Orange on the left side, this should indicate there is a 100MB connection.
Click “F5” on the tab that has the DHCP Lease Page open, this will do a refresh, the new device will pop up. It should show up Linaro (something). Here, it was renamed to device device.
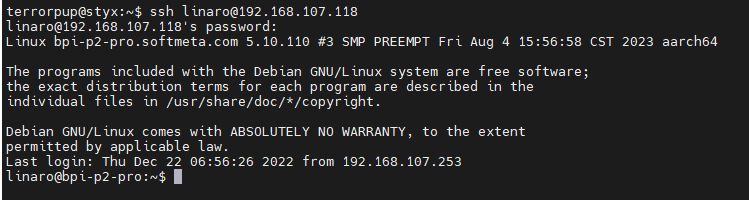
Now ssh can connect to the ip with Xmobaxterm/Putty/Terminate session.
UserName: linaro
Password: linaro
Part 3 – How to use NMAP to find device.
The next part, is simalar to the gui, but a tool called called nmap is needed. Nmap, is a tool that network engineer/hackers use to scan for devices, or what ports are open on a device. Another tool that is very useful to Linux Engineer is diff, it used mainly on text files like configuration files to see what is different between the two.
SSH to the machine that the scan will be done from.
Next run the following command
nmap -sP <iprange/netmask> >> beforescan.txt
- -sP = scan ping
- iprange = example 10.0.0.0/8, 172.16.1.0/16 or 192.168.1.0/24 ( Which most home routers use.)
- >> = Take the out put and append the file until done. > will only get the first line.
- beforescan.txt = Doesn’t need txt, just a file name that before powering up the devices.
In this example we are going to use VLAN107, that was setup on the Banana-Pi R3.

From Part 2, do the same three steps to hook up the device and power on.
Now, run the nmap once more
nmap -sP <iprange/netmask> >> afterscan.txt

(Yes, after is misspelled, but it will work.)
Now a diff need to ran between the two files. diff file1 file2
< = File 1
> = File 2
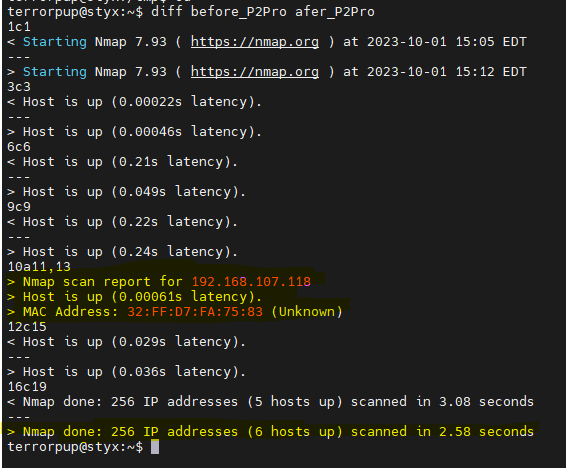
Here it can be seen that host ( highlighted in yellow ) was not in the original scan, it has been assign an IP 192.168.107.118, that the MAC ADDRESS is 32:FF:D7:FA:75:83. This is helpful because if the ip changes, you can do the following to find it. sudo nmap -sP <iprange> | grep MACADDRESS -B2
-B # = the number of lines to show before the searched item. In this case, the IP is usually two above/before the MAC ADDRESS.
Use Nmap to make sure ssh is open nmap <bpip2proip>
A return should show, like the image example
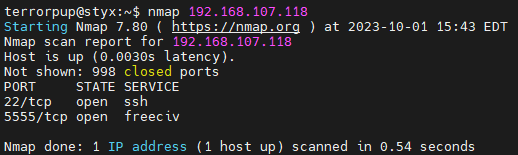
Now for any host ssh to the BPi-P2 Pro ( Note: USE ID and Passwd Are above ) ssh linaro@<bpiproip>
Part 4 — UART Cable
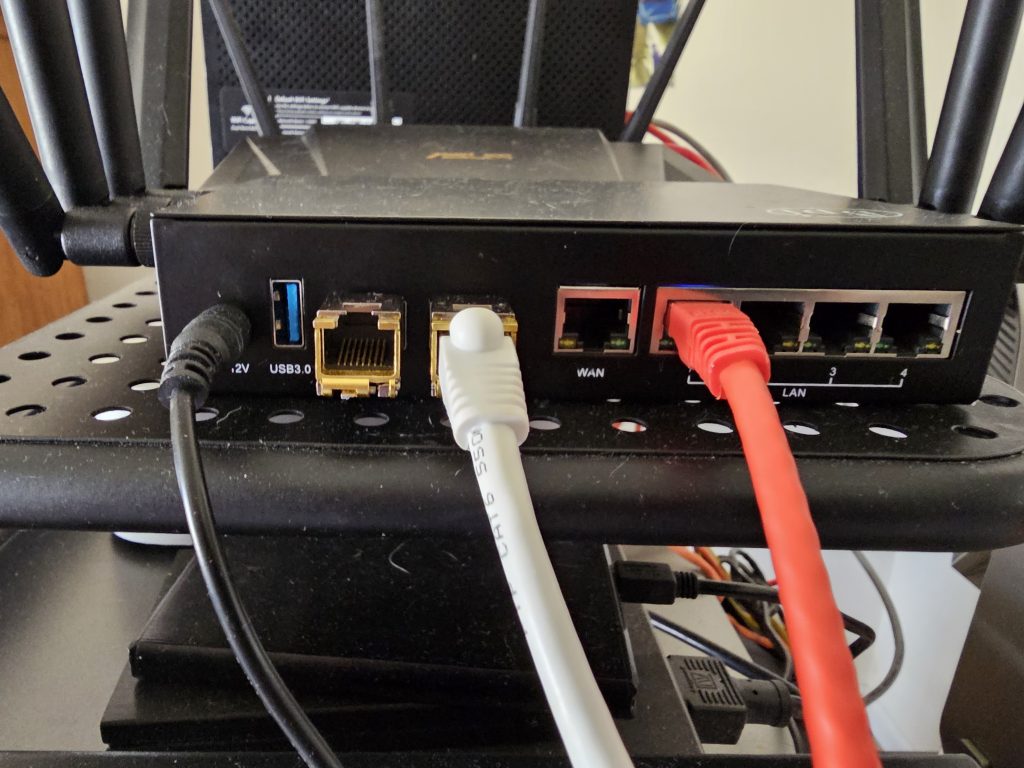
On the right side of the board there is a twelve pin, near the 40 Pin GPIO. Hook up the following pin in these order in the table below. Pin 11 and 12 is the closest on the inside of the board, next the wifi/bluetooth chip. Odd is on the left ( Inside, towards the CPU ) and Even is on the Right ( Outside )
| Pin Number | Function |
| 11 | RX (Board) / TX (Cable) |
| 9 | TX(Board)/ RX (Cable ) |
| 8 | Ground |
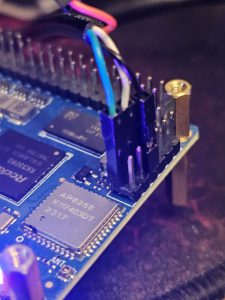
In the image above, there are the cable colors are as follows
Green = TXD
White = RXD
Black = Ground
Red = VCC ( Not Used )
Speed ( baudrate): 1500000 ( 1, 5, five zeroes. I recommend Mobaxterm )
Data bit: 8
Stop bit: 1
Parity: none
Flow Control: None
Once the cables are hooked up, power on the device. Use Mobaxterm/Minicom/Picocom to start aserial session, the device output will start to show as it booting up.
Sample of the device booting up
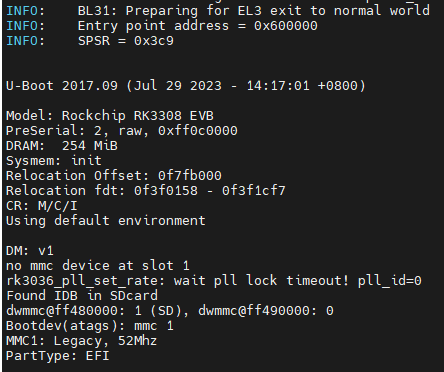
When device is done booting it will be in the root account. No need to enter a password, but if you don’t want to use the linaro user, then setup a new server and password.
To see what the ip of the device is, run the following command.
ip -c addr show Now the Banapi-Pi BPi-Pro is setup. Another blog post will follow configure the device to run an app. At the time of this writing, still learning what is best to run on the app.
Part 5 – Wireless Setup
The finial part is to setup wifi.
If the wifi is missing, run the following command as root insmod /system/lib/modules/bcmdhd.ko firmware_path=/system/etc/firmware/ nvram_path=/system/etc/firmware/
This will bring the wifi up.
cd /etc/wpa_supplicant

vim wpa_supplicant.conf

network {
       ssid="wifinetworkname"
       psk="passwordforwifi"
       key_mgmt=WPA-PSK
}

wpa_supplicant -B -i wlan0 -c /etc/wpa_supplicant/wpa_supplicant.conf

wpa_cli -i wlan0 -p /var/run/wpa_supplicant reconfigure
wpa_cli -i wlan0 -p /var/run/wpa_supplicant reconnect
If that does not work. Run the following command
sudo nmtuiThe select “Activate a Connection“
Under Wi-Fi, select the network that the device need to connect to.
Select Security and Enter in the SSID Password
NOTE: On the setup that is shown, it’s not saving the setup for the wifi or locale, which is being worked out.
NOTE: I want to Thank NicoD, who if you haven’t checked out this channel please do. He helped me get the SD card parted worked out, I’ve been working a month trying to understand the document. I hope this guide helps.
Pingback: Setup Static IP and DNS on the Banana-Pi BPi-P2-Pro from the UART – UglyScale Press
please continue to show boot from emmc