I haven’t posted to a blog in a long, long time. This is my first post for UglyPress
I have two labs. I have a half rack of servers that I run a number of virts on baremetal. I use openSUSE TumbleWeed running libvirtd and qemu. I have great luck with those servers. Simple and free. The secondary lab is my collections of Small Computer boards. Which limits what I run there, because even though Arm Processors are coming along, not everything is supported.
My Goal
I am not into docker, not because I don’t like it. I just didn’t have time to learn it fully. Docker, and no offence it changes quicker than Ruby does. ( That’s a joke, if you have worked Ruby you will understand that. ) I do have a couple pi’s running dockers images apps, Heimdall and GitLab. What I want to do was to see was to see if I can host virtual machines on a Small Board Computer (SBC).
Why yes, yes it can
So I googled what it would take to run virtual machines using libvirtd on Pi, I figure that would be the easiest. One thing that Pi’s have shown everyone that you can emulate systems using software. Virtualization should be easy. I got lucky I found a post from a few years ago.
Raspberry Pi 4
To start, you will need a Raspberry Pi 4 8 gigs. Debian, RapsberryOS, or Armbian. Make sure that it also 64-bit version of the OS. The post that found stated that it can do it with a 4 gigs, but the performances was horrilble. The other thing I am going to recommend is to use NVMe or SSD storage with your pi because SD I/O slow. I have Argon M2 case, with 256 Gigbyte NVMe in it. Another option is to use a Pi Hat that can use 2.5″ Hard Drive.
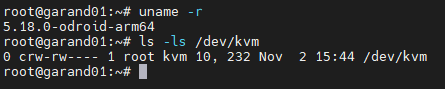
Let’s check to see if the kernel can run virts. Run the following command.
uname -r
If the kernel returns x.x.x-v7l+, then we need to update the config.txt. Before any changes are made, make a backup of the file.
vim /boot/config.txt
At the bottom of the file, add the following line
arm_64bit=1
Next make sure the OS is up-to-date.sudo apt update && apt full-upgrade<br> sudo reboot
Once the Pi is back up, check the kernel, it need to show the following, x.x.xx-v*+
Last thing to make sure kvm device that is used by libvirtd is there.sudo ls -lh /dev/kvm
If it shows, it’s time to install software that is needed to be install. NOTE: This will be used for Ordroid as wellsudo apt install virt-manager libvirt0 qemu-system
Libvirtd needs to be ran by a user who is a member of the libvirt-qemu group. Then reboot so that the change takes effect.sudo usermod -aG libvirt-qemu $(whoami) <br> sudo reboot
Once the pi is back up, let’s set the service to auto-start at bootup. Setup the private network to start. 192.168.122.0/24sudo systemctl enable --now libvirtd<br> sudo virsh netstart default<br> sudo virsh net-autostart default<br>
Odroid M1
I want to try a more modern board. This year I had purchase two Odroid M1. The first I can’t use because it running Debian 10, there is no /dev/kvm, plus it running on a SD card. Remember disk i/o matters with virtual hosts. My second is the one that I used. I found that Debian 11 does have the kvm device needed, and I had installed the OS on NVMe. The processor is a Rock Chip which in the SBC work is getting great praise for it’s performance. Last thing, this SBC has 8 gigs of memory.
The Ordroid M1 is a lot easier.
Recommendation
* M1 – 8 Gig
* NVMe or emmc – Size should be 128 Gigs =<
* Debian 11/Ubuntu 22
Later I write blog later how to use petitboot to install Debian 11. The kernel as noted is already setup to run kvm’s. So there no need to change any boot files.
Follow instruction above now to install the software.
Creating a virtual machine
I was a bit disappointing because the virtual host on the PI from the post that I followed, would only boot up in text mode. If anything with graphics would show on the screen they were displayed as ASCII charaters. This will impossible to install modern versions of Linux. The post that I had followed, used Al[one with virtual image, instead of ISO. I will show that is need to be added so that graphicals will come up. It was one the first things I tested when I got software for virt-manager installed.
Need to download an iso, need to make sure it Arm (aarch64). I have not tried to run X86 Machine, with Qemu you can run other processor. I know a few folks that run PowerPC with Qemu so they can work with Mac OS.
Once the iso is download copy it to the following directory. For this post I will be using openSUSE Tumbleweed. I have tried Fedora 37 and Red Hat Enterprise 9. This blog will assume that you are using X.cp Downloads/openSUSE-Tumbleweed-DVD-aarch64-Snapshot20221024-Media.iso /var/lib/libvirt/images
Launch Virt-Manager, the icon of the computer with star on it.

The first window will be what media to select. Here select “Local install media (ISO image or CDROM) click on “Forward”

Next need to select the iso that was copied over. Click on “Browse…”

CLick on the iso that will be used and click on “Choose Volume”, then uncheck “Automatically…” at the bottom. Click on the Magify glass and select the OS that will be used. Click on “Forward”
Unlike a baremetal server, a lot of memory can’t be allocated to the virt, so choose what best for the OS that being installed. With openSUSE Tumbleweed, we will use 2 Gigs ( 2048 ) and two cores. Once the memory and cpu has been selected, click on “Forward”

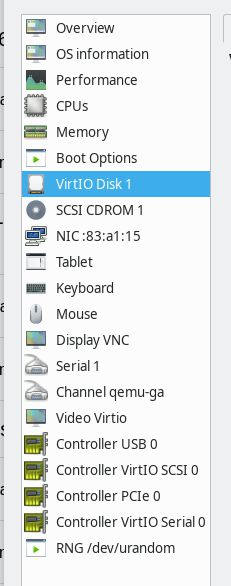
Before launching the virtual machine, click on “Customize configuration before install”, a few things need to be add to launch with graphic support, click on “Finish”
Click on add hardware
Click on on Video, change Vitro to VGA then click on “Finish”

Need to add usb devices…
USB Table

USB Keyboard

USB Mouse

Graphics
Select Graphics. I am going to recommend VNC over Spice. Both are great, but Spice seem to be jumpy when the mouse is moved. VNC seem to be stable and the mouse doesn’t jump all over the place.

Now that extra items that would normally be there if x86_64 was being used. Make sure that the hardward for the virtual machone looks like the following.
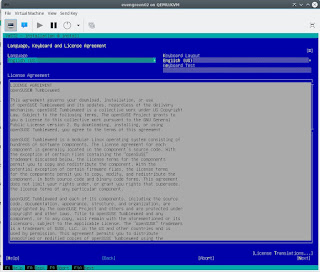
Click on “Begin Installation”. Now, the boot up process it going to take a while, I have tested with three OS’es, the boot up time was about the same. Once iso boot’s up, you will see the following screen below.
I will post a blog later to example how to setup a bridge device with “NetworkManager”, for now the virtual network that was setup early will connect to internet via NAT’ing. Click on “Open”, then click on “NIC xx:xx:xx”, there the IP should show, it should be “192.168.122.0/24”
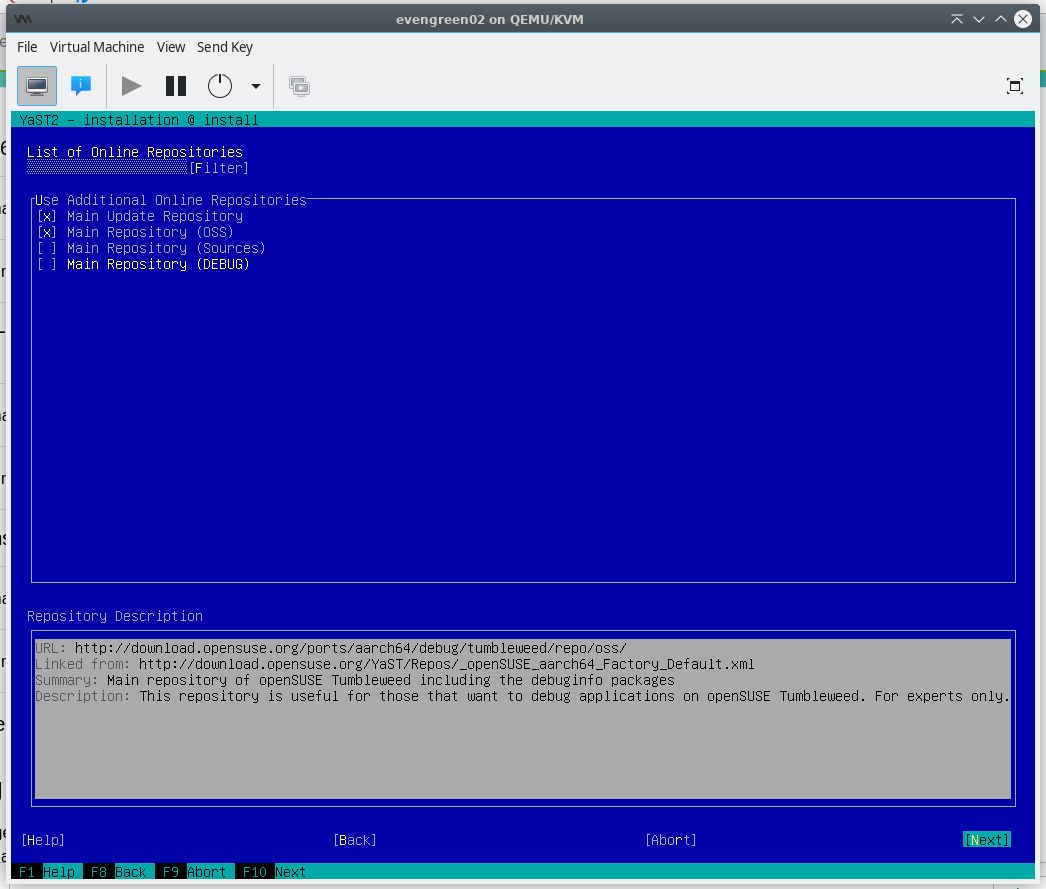
If NAT’ing is working correctly it will go out and connect to online repos.

Moving along, select a desktop, XFCE ( X Face ), it’s light weight, works great. Usually recommend using WindowMaker, a NeXTStep clone that very light weight.

Setup the partition, for this demo, setup with autoselect was is best.

Select the time zone

Setup a users

If everything looks good, need to select install twice, to begin the installation.


The installation will now run and once done, the virtual machine will reboot. Grub shows a black screen, I haven’t figured out why, but after a few mintues XFCE4 desktop will pop up.


Libvirtd, kvm ( Kernel Virtual Machine ). With the Pi, because I only have 4 gigs, I was only able to get the Alpine up and running and the perforamces was again, hobbile. The M1 can only run a few machines because the limit of the memory of the board. I was able to run three virtual machines up and running at the same time.
My Odroid M1 has NVMe M2 with 256 GB of space. So each virtual machines setup with the following…
50 Gig Hard Drive
4 Cores ( This is the max cores for Odroid )
2 Gigs

The load and memory on the Odroid M1 has been good, the small board computer hasn’t been taxed nor has the system performace taking a hit.

Thoughs
The real nice thing about using Small Board Computer(SBC), the power. Where I love using my baremetal servers, dual 700 Watt power, create a lot of noise and heat. In my house it does drive up my power bill. Where the Odroid is using 20W power supply. I am hoping that in the future SBC will have more cores and memory. I like to try a Khadas board. They have several boards that could be great, like the Khadas Edge 2, 16 Gigs of memory and 8 course of memory.
Is this helpful? I know most people are moving away from virtual machine to docker, because of the power use, number of images that can be ran. There is trade off. One, a lot of vendor are force people to use containers so you don’t know what in the image unless you know enought about docker compser to open image and example them. I am not one for blind trust. I am seeing a day were someone get hold of docker images and placing a back door and it months later that it found. With a virtual it is a bit more secure, but software that is download or install could have that same back door.
Please leave a comment.Thank you for reading this…
Note: I love to test the following with other boards. If you are a board makering. Please reach out to me, I love to review and test...
Your validation of VM configuration graphic shows video as ‘virto’ but you qualify in the discussion that it should be set to ‘VGA’, is the discussion wrong or is the graphic image wrong? I suspect the graphic image is wrong. You also have tablet in the graphic not USB keyboard and mouse. Also, you seem to have removed the ‘Console 1’ device which is setup by default for the VM by virt-manager.
Let me go back validate. I will update my notes.
More over, using aarach64, KVM VM, even with video get to VNC, and graphics set to VNC, I still get ‘Guest has not initialized the display (yet).’ error.