Have you ever wanted something so bad, that you extensively search and when you find it, you don’t mind buying it used. That was the case with me, I wanted a Libre Computer Renegade Elite. It was at the time, the only Libre Comptuer board I was missing.
Looking on EBay, I found one. That came in a case with 128 GB eMMC. It was missing a power supply, no biggie I could buy one off LoveRPI.
I ordered from LoveRPi the power supply needed. I was set.
The board was delivery, Christmas had came to me. I now had all the Libre Computer Boards. Then like everything that you wish for, reality set in. I powered it up, it wouldn’t show any power LEDS, the screen was blank and nothing was working. I was heart broken. I reached back out to the buyer, who stated it was a NON-Brick board that needed to be fixed. I didn’t notice that in the description that it said it was “NON Bricked”. I was truly heart broken.
I did a lot of research. I was going to figure out, how to save and get my Renegade Elite working again. Most of the sites that I had read, said I need to hook up an UART cable. What was that? From LibreComputer Site to FireFly web site about the board, state that it was most like the SPI Firmware. Everything talked about setting up UART cable. I was so confused, because most of the stuff I read online was that one needed to make a UART cable. It only added salt to my pain. I even talked to the engineer who design all the Libre Computer boards. He repeated what I had read, that I need to hook up UART cable to see what was going on at boot.
Then, a friend of mine, NicoD create a video called “Debug Armbian with UART“. Wow, I don’t have to create a cable, I could buy a UART USB Cable or just the USB UART Device. I had hope again. This was followed up by LoveRPi selling UART cables. With this new information I bought a USB Device off Amazon, but I bought a couple LoveRPi’s UART Cables as well. I was now set.
Let the, “fun” begin.
Ok, I had the tools. I watched the video from NicoD a few times. Then read on HUB how to set up MobaXterm. The first board I setup with the UART Cable, was my Banana-Pi BPi-R2 Pro. I wanted to try a board that I knew should work, it was new. Talking about having your eyes opened, there was a whole world of the small board computers I was missing. Why I did not know about how to the UART?!?! I know it exists because there are the connections on most boards that aren’t a Raspberry Pi.
Time to work…
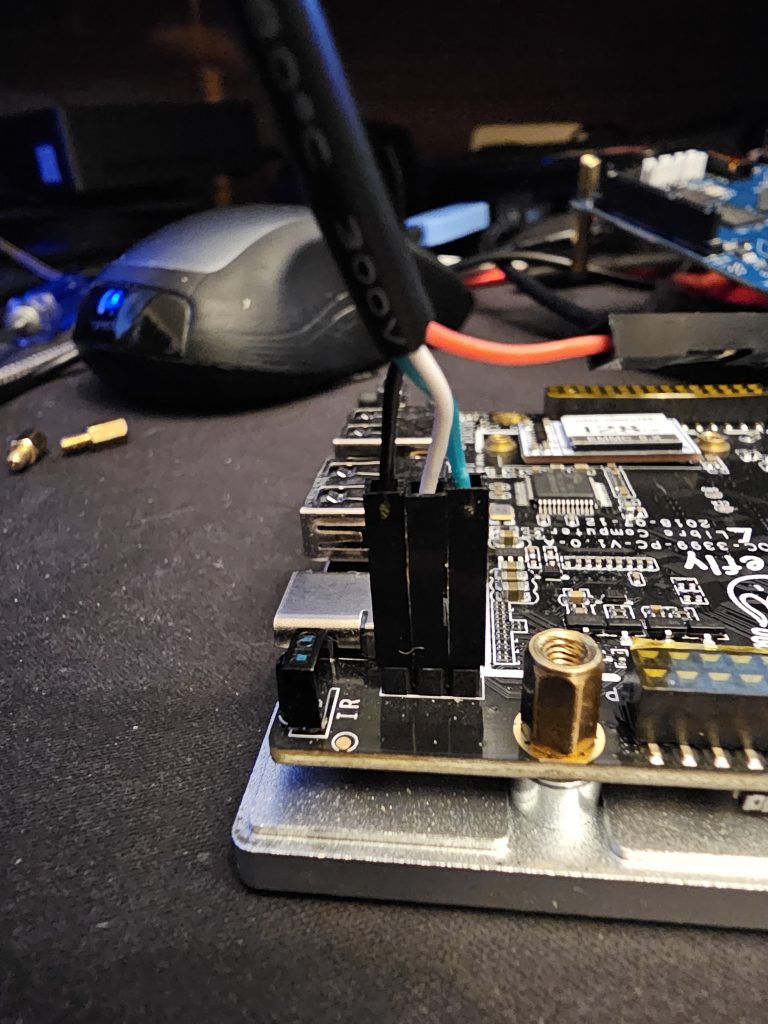
The UART cable wires had four color wires, each had it’s own function
| Green | TXD |
| Red | VCC |
| White | RXD |
| Black | Ground |
I had to try a few times before getting it working, but I was able to get the right wire order.
The Session
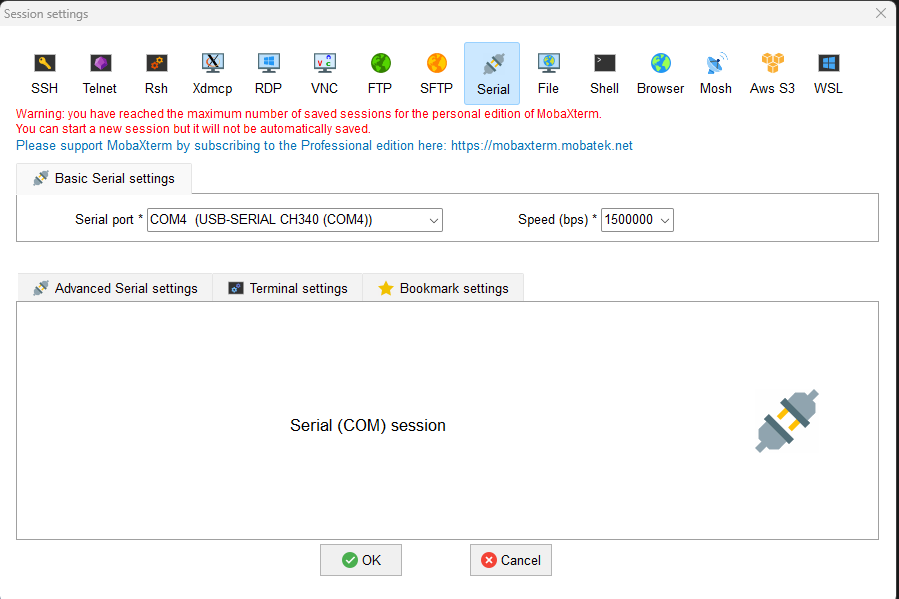
I could have done this on Linux with Picocom or Minicom, but I wanted to use my pc that I make my videos on. Thank you Mobaxterm for being able to set this up, it’s the tool to use on Windows.
1) Press the Session Icon
2) Select Serial
3) From Serial Port, press the down arrow and select the USB COMM Port, set the speed to 1500000, press OK.
I plugged it up. I thought nothing wasn’t going to show with the power plugged in, that I had truly bought bricked board. Surprise, it’s not bricked, thank God! Now, I could see what had happened. The person who owned before me, updated the SPI with the wrong board Software. I am not sure how, but they have updated the SPI with Radxa Rock Pi 4B. Ugh!

There will be a part two for this blog. I now have to figure out how to update the SPI with the correct SPI Firmware for the board. Hopefully it will boot correctly after that.